
CV boot replacement
Half Axle Replacement
So I find out my 86 Jetta GLi had a bad left outer CV boot (inner boots rarely go bad). I saw a grease spray on the parts in that area. The hole was pretty small, so I knew it hadn't been that way for a real long time.
In order to do this job, you will need some special tools that the average "Joe Mechanic" may not have (but can get). Here are the tools I used for the following job....
- 17mm and 30mm sockets
- 17mm wrench
- small and large ball peen hammers
- large pry bar
- 24" extension for your ratchet (makes removing CV joint bolts easier)
- 12 point "torx" tool for inner CV joint bolts.
- cheater pipe
- side cutter pliers
- brake cleaner
- jack and JACK STANDS!
If you don't have jack stands, then do not bother to try this. Your beloved VW may crush you!
Video credits belong to the love of my life, my talented and beautiful wife, Andi Damewood.
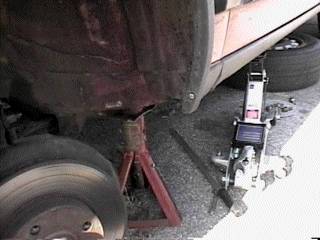 |
Remove the wheel and support the car as shown in the link above.. |
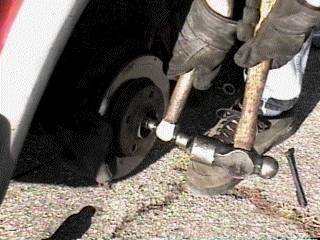
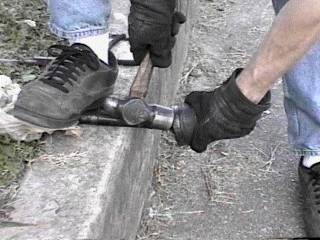
| Now remove the 30mm nut from the CV joint. I'm using a "cheater pipe" on my ratchet, to which it is really a scrap piece of exhaust pipe I got when I worked at a muffler shop. Stop on in a muffler shop and ask for a small piece of scrap, chances are they will give you more than you need for free. At this point, you may need to have a friend step on the brake to keep things from turning. |
 |
 |
Once you remove that nut and the washer behind it, you should be able to push the CV joint in towards the motor by hand. If not, spray some WD-40 or the like around it, then using 2 hammers as show, tap on it until it breaks free. Notice how the ball of the small hammer is resting in the indent of the CV joint so I don't damage the threads there! A3 owners, you may have to use a tool to press the outer CV joint from the hub. VW "glued" some of them suckers in place and you won't get it out it a hammer! |
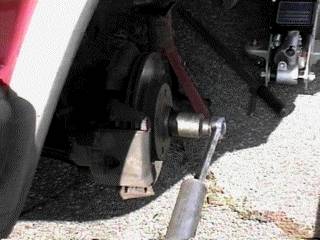
| With the 17mm socket and wrench, remove the bolt that clamps the stud of the lower ball joint. |
 |
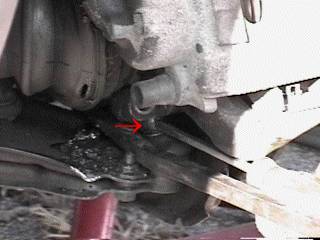 |
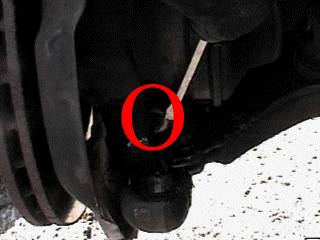
Using a pry bar or large screw driver, loosen the ball joint from the knuckle. You are just wanting to make sure they aren't stuck together once the bolt has been removed. As you can see where the arrow is pointing, I've moved it some and exposed some of the stud. Sometimes you have to use a hammer and hit the lower control arm to help jar things loose. |
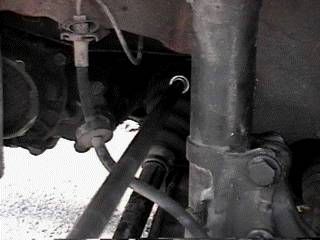
| Now with your pry bar, stick in into that hole in the control arm and pry downward. This will clear the lower ball joint from the knuckle. Once you've gotten that clear, pull outward on the strut and get the CV joint out of the knuckle as well. |
 |
 |
As you can see here, you can pull the strut/brake asm out quite a bit so you can remove the CV axle from it. |
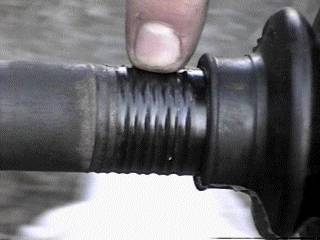
| Here is the hole in my CV boot. A pretty small hole, but a hole none the less, and it isn't going to get better with time. |
 |
 |
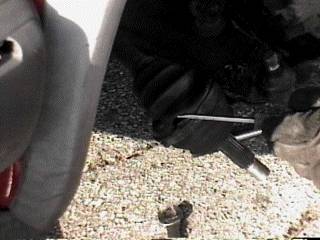
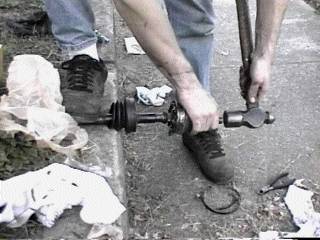
Now here is the tool needed to remove most half axles on water cooled VWs. It is like a torx bit, but has 12 points on it (Mac Tool # SC89). While you can force a hex or torx bit into the bolts that bolt the half axle to the tranny, I wouldn't do it. You can round out the bolt and not be able to tighten it back up. |
| With that 12 point tool on the end of my 24" extension, I remove the 6 bolts. |
 |
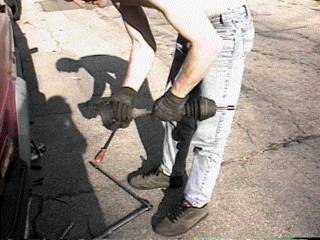 |
With the 6 bolts remove, the half axle is free from the car. From this point, it is just the reverse to reinstall. For me, I am now ready to install a new CV boot. |
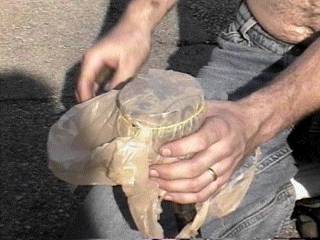
| While the half axle is out, I want to keep the inner CV joint "clean". I've taken a plastic shopping bag and covered up the open part of the inner CV and used a rubber band to keep the bag in place. |
 |
 |
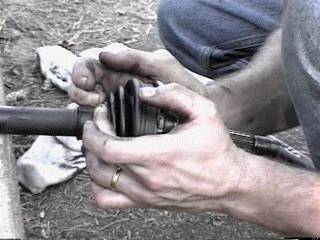
Using my side cutters (dikes), I'm removing the metal bands that keep the CV boot in place. Once those are gone, I'll cut the old CV boot off. |
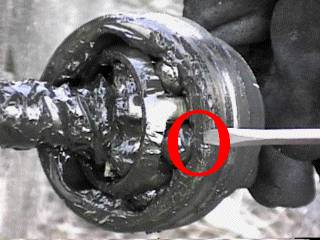
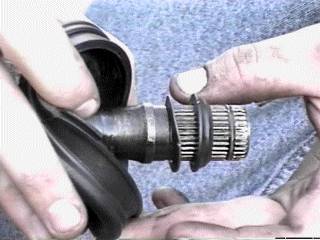
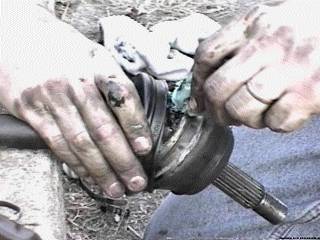
| I used a hammer to free the outer CV joint from the half axle. There is a wrong place to hit a CV joint and a correct place to hit it. Seen here is the correct location to hit it with a hammer, the outer most area. Never EVER hit the cage! |
 |
 |
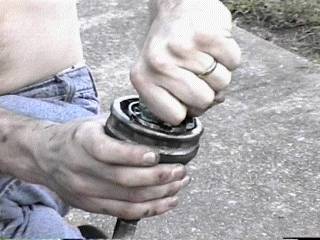
While using a bench top vice is nice, I didn't have one handy, so I'm standing on the half axle. Anyway, notice how I've got the CV joint tilted at an angle so the hammer will only strike the outer part of it. It only took a few taps to free it from the shaft. |
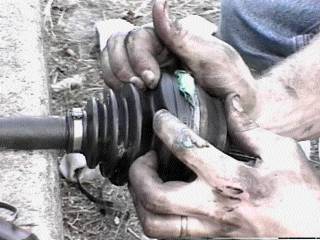
| With the CV joint free, use a can of brake cleaner to clean out the old grease. Do this in a neighbors yard since that brake cleaner tends to kill grass. Get as much grease out as you can. |
 |
 |
Once you've cleaned out the CV joint, set it aside. With a old rag, wipe clean the axle shaft. Then slide on the smaller metal band that came with the CV boot, and next the CV boot itself. |
| Return the 2 washers that came off of the shaft..... |
 |
 |
Now take the CV grease that came with the CV boot, cut a small hole it it. I cut off a corner of the bag and then stuff that corner into the opening of the CV joint and squeeze the grease in until I see if ooze out around the edges. |
| Once you greased up the CV joint, you are ready to return it to the shaft. Make sure you have the splines lined up, then use a hammer to tap it back into place. While the CV boot kit came with a new snap ring, I didn't use it. I've run into more problems using a new snap ring. They can get get trapped between the CV joint and the shaft sometimes. Anyway, you shouldn't have to tap too hard at all to get the half axle to pop into place. |
 |
 |
Now slide the boot up so it is against the CV joint. |
| The smaller end of the CV boot will need to be clamped over these ridges. These help keep the CV boot in place. |
 |
 |
Once you clamp the smaller part of the CV boot in place, squeeze the rest of the CV grease into the CV boot. |
| Pop the larger end of the boot over the CV joint and use the metal band to clamp it in place. You are now ready to reinstall the half axle. |
 |
Click here to vote for my site if you find the info useful. Thank you.

All Step-By-Steps use Postcard-ware fees, if you find the info useful, then please send a postcard to:
4130 Products
740 Schenley Rd
Knoxville, TN 37923
Why should you send a postcard? Because it is cheap to do and as we all know, the US Post Office is funding it's Super Muntant Army Project with fees from postcards stamps. I would really like to see a Super Muntant Army deliever my mail in the near future.
Thank you.
