Frida Karlsson
All rights reserved


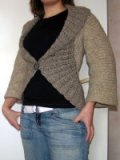

KNITTED CARDIGAN
When I made this I had alot of help from the discussion about Suz_Anne's crocheted bed jacket on Craftster.Size: Fits me with a 90 cm wide bust, it's quite tight so if your bust size is wider, recalculate the number of stitches.
Gauge: 24 stitches in 10 cm when knitting 2 * 1 ribb (K2, P1 on right side, P2, K1 on wrong side) and about 25 rounds in 10 cm. I used a 3,5 mm long circular needle. It's possible to knit with a different gauge, but you have to recalculate the number of stitches. (If you need help contact me)
ABBREVIATIONS
CO = cast on
st = stitch/sitches
K = knit
P = purl
YO = yarn over
Sl = slip stitch
K2tog = Knit 2 stitches togheter
PSSO = Insert left needle into the front of the slipped stitch and pull it over the knitted one
* ... * = repeat
RIB PATTERN
Row 1: * P1 K2 * (right side)
Row 2: * P2 K1 * (wrong side)
This rib pattern should be used for the gauge swatch and for the main body of the cardigan.
LACE EDINGS
This is where you start your knitting! CO 265 st
Row 1: * K1, P7 *, K1
Row 2: * P1, YO, K2, Sl1, K2tog, PSSO, K2, YO *, P1
Row 3: as row 1
Row 4: * P1, K7 *, P1
Repeat rows 1 to 4
Row 16: * P1, K2, Sl1, K2tog, PSSO, K2 *, P1
Row 17: * K1, P5 *, K1
Row 18: * P1, YO, K1, Sl1, K2tog, PSSO, K1, YO *, P1
Row 19: as row 17
Row 20: * P1, K5 *, P1
Repeat rows 17 to 20
Row 32: * P1, K1, Sl1, K2tog, PSSO, K1 *, P1
Row 33: * K1, P3 *, K1
Row 34: * P1, YO, Sl1, K2tog, PSSO, YO *, P1
Row 35: as row 33
Row 36: * P1, K3 *, P1
Repeat rows 33 to 36
Row 48: * P1, K1, K2tog *, P1
Row 49: * K1, P2 *, K1 (it should be a total of 100 stitches now)
Put on scrap yarn. This lace edging will be used later for the front body.
Make one more lace edging in the same manner as the first one, keep that one on the needles. This lace edging will be used for the body back.

Continue on the lace edging that's on the needles.
Row 1: Knit 70 st (using the rib patten, * P1, K2 *). This is the right side of the knitting. Turn.
Row 2: Knit 40 st (knit stiches that where purled on previously row and purl stitches that where knit on previously row). This is the wrong side of the knitting. Turn.
Row 3: Knit 42 st (knit stiches that where purled on previously row and purl stitches that where knit on previously row). Turn.
Row 4: Knit 44 st (knit stiches that where purled on previously row and purl stitches that where knit on previously row). Turn.
Row 5: Knit 46 st (knit stiches that where purled on previously row and purl stitches that where knit on previously row). Turn.
Continue like this knitting 2 more stitches for each row until you are knitting all of the 100 stitches. This will shape the lower edge of the body back.
Continue to knit the rib for 14 cm. When that's done it's time for the arms.
CO 87 new stitches on one edge. Turn, knit to the other edge, CO 87 new stitches. (I figure that the arms would stretch out, so I calculated with the gauge 20 st in 10 cm, but they are a bit short. If you change the number, make sure that the number of stitches can be divided with 3.)
Knit until the arms are 22 cm high. Put on scrap yarn.

BODY FRONT
Put the lace edging that's on scrap yarn on the needles. You should still use the 2 * 1 rib.
Knit 2 st, turn, knit 2 st, turn, knit 4 st, turn, knit 4 st, turn, knit 6 st, turn, knit 6 st... continue knitting, knitting 2 more st every other row until you are knitting 20 st.
Knit one more st instead of 2 every other row.
When the edge of the rib measures 14 cm (the same height as the back side) increase 87 st for the arm.
Continue to knit one more st every other row. When you are knitting 87 (the arm) + 35 (the body front) st continue until the other side.
Do the same thing on that side. (Start with 2 st and knit 2 more st every other row, when you reach 20 st, knit one more every other row, increase 87 st for the arm, knit until you are doing 87 + 35 st.)
Knit all of the st, from the edge of one arm to the other.
Knit until the arms are 22 cm high.
FINISHING
Sew the two parts together in the middle of the arms using the grafting method.
(Also called the Kitchener Stitch, for instructions go here:
Basic Knitting Techniques Look under Finishing
Mini Knitting Lessons Look under closing toes
Knit Tutorial - Kitchener Stitch)
Fold and sew together under the arms and the sides.
Close with buttons or perhaps a pin.
If you have a problem or a question, feel free to mail me and I'll do my best to help. The adress is to the left.
GOOD LUCK!